When I first started Warhammer, I was more than a little confused by all the different kinds of paints. Base, layer, shades, contrasts, what does it all mean? Today I want to walk through a paint job I did recently to help demonstrate what these paint types are used for.
Disclaimer: This post mostly uses Citadel Paints because of their Base/Shade/Layer classification system that makes learning to paint easy. Other paint brands such as Pro Acryl, Army Painter, and Vallejo are just as valid.
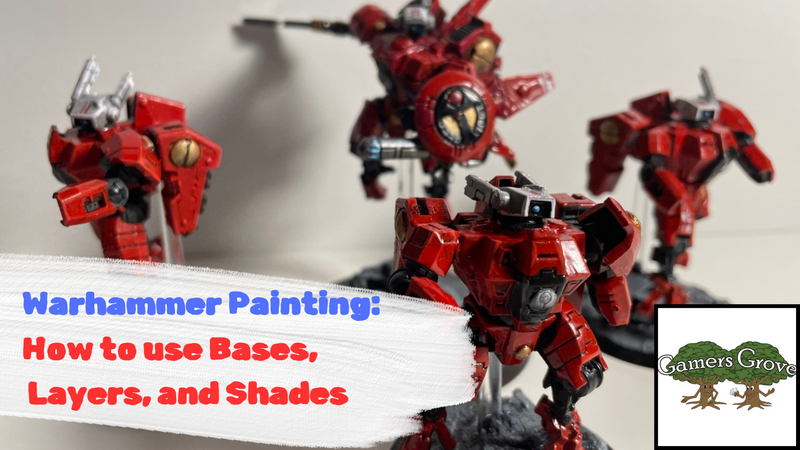
The Project
I recently acquired an old Commander Farsight model as part of my new 40K T’au army. I got him all painted up and re-based but need a squad of Crisis Suits for him to lead! I’ve decided to use his paint scheme on them instead of the traditional box-art scheme I used to paint the rest of my Crisis Suits with. This will make them have nice cohesion on the tabletop but also leans into the lore of the Farsight Enclaves, a sect of T’au loyal to Commander Farsight.
While my examples in this post are tied to this specific project, the process I lay out is applicable to any model you paint! If you ever have any questions or want more details you can always come as us at the shop or in the official Gamers Grove Discord.
Step 1: Priming and Basing
The first thing I did after building was spray the Crisis Suits with Citadel Chaos Black primer. Always prime your models! Primer binds to plastic and paint, allowing your paint to adhere strongly to the model. Without primer, your paint will crack and chip off over time.
Then I base coated all the areas I wanted red in Citadel Mephiston Red. Mephiston Red is a base paint, heavily pigmented with great coverage to form the basis of your paint job. I also apply a base coat Citadel Celestra Grey onto the model’s head and chest symbol. If you mess up and get some base paint somewhere you don’t want it, don’t worry! You can always fix it later.
Step 2: Shading
Next let me introduce you to one of my favorite kinds of paints: Shades. These paints are extremely fluid with heavy pigments that seep into the cracks and crevices of models to apply a deep shadow effect. For this model we’re using Agrax Earthshade, a brown shade that goes well over warm tones like red.
For this step I got a big brush and slathered Agrax Earthshade all over the head and red armor parts of the model. This is called washing, as we’re essentially bathing the model in the shade paint. If there’s too much Agrax Earthshade pooling on flat surfaces, you can easily just smooth it out onto other areas that need the shade or use a dry paint brush to wick away any excess.

Step 3: Layer Painting
Once the Agrax Earthshade has dried, I took some Citadel Evil Suns Scarlet and repainted all the red armor with it. While I did so, I took care to leave the crevices and panel lines alone to preserve the shade paint in them. Sometimes it’s helpful to use the long side of your brush with light strokes to paint over these areas so that no bristles poke into the crevices.
I then did the same with Citadel Ulthuan Grey over the Celestra Grey we used earlier on the head and chest symbol.
These layer paints are slightly transparent and will pick up the colors beneath them while adding a bright pop. For example, the red of the Mephiston Red base paint beneath Evil Suns will produce a rich crimson color. This will all be framed with dark brown Agrax Earthshade in the deep recesses of the model.
Also, at this stage I took some Citadel Corvus Black layer paint and went over all the areas where I’ve left the black primer visible (mostly the metal frame of the mech suit). This is a great time to fix any overspill into the black areas.
As you paint on these layers, consider going back over flat surfaces as the paint dries to build up a second thin coat of paint.
Step 4: Edge Highlighting and Details
With the base coat, shade, and layering done now we come to detail work! Using the flat edge of a small brush I took Citadel Wild Rider Red layer paint and lightly applied it to the edges of all the red areas. I find it’s often best to wick some of the paint off your brush before starting each stroke to make sure you don’t accidentally apply too much. This mimics light hitting the model and provides a ton of depth and tone to its colors!
I did the same with Pro Acryl Bold Titanium White on all the white areas and Citadel Dawnstone for the black areas. It’s a little weird to use such a light grey over black but it is the best way to highlight black edges.
Next was a layer of Retributor Armor, washed with Guilliman Flesh contrast paint (though you can also use Agrax Earthshade), then highlighted with Pro Acryl Bright Gold on all the exposed metal bits.
Finally, I used a dab of Citadel Baharroth Blue over the lenses of the model’s eyes. When that dried, I target washed with a tiny brush each lens with Citadel Drankenof Nightshade. I followed this with a small stroke in the center of each eye with a tiny amount of Baharroth Blue and then one small prick of Pro Acryl Bold Titanium White for a lens glare effect.
Step 5: Varnish!
This is when you would put on any decals you want. For my models, I used some of the Vior’la T’au decals that come with various models. To apply these, you soak the decal in water, apply it to the model on top of a small brushed on wet coat of matte varnish, then apply more matte varnish on top. Once this dries the decal should stay put!
Then I sprayed the entire model with Vallejo Matte Varnish. This will tie all the colors together with one nice flat texture while also protecting your model and providing an additional seal for your decals. One extra step is to take Gloss varnish and dab it onto eyes and lenses for some detailed shine.

And That’s It!
It may seem like a lot but look back at this blog post, it’s only 5 steps! Prime & base, wash, layer, detail, varnish, it’s easy! When I first started Warhammer, I felt like I was not skilled enough to paint. The truth is that you don’t need skill, you need knowledge. With the right techniques and guidance, even someone with no artistic ability (like myself) can make models look great on the tabletop.
For more advice on painting, be sure to join us every Thursday for Hobby Night at 6pm! This is where all our local wargaming nerds get together to build, paint, and play with our models. Thanks for reading and, as always, we’ll see you at the Grove.